Click on the images to view additional notes.
Login/ Create Blog
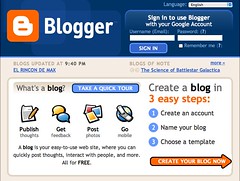
Go to Blogger.com to sign up for an account.
STEP 1: Create a Google account
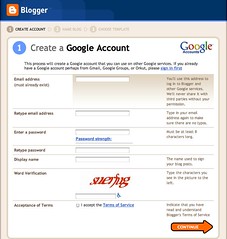
You need a Google user account in order to create a blog with Blogger.com ('cos Blogger.com is owned by Google).
You don't need to create an account if you already have Google-related accounts like Gmail and Google Groups (read the instructions below the header "Create a Google Account".
Blogger.com requires you to enter an email address (you can always create an additional email account Gmail, Yahoo! or Hotmail).
TIP: Write down all the addresses/ IDs/ passwords that you create along the way. And keep this safe (destroy it once you've committed it to memory). Some participants get confused after signing up for a few things along the way, that they can't log in to their accounts when they try to do after the session)
The Word Verification is a feature for blogger to ensure it's a human being that's creating an account, rather than an automatic program (spambot).
IMPORTANT: Keep your password secret. Google will never, ever ask you for your passwords. If you ever receive any emails asking you for your account ID and passwords, read it very very carefully and you probably should ignore it. Because they are likely to be scam mails.
STEP 2: Name your blog
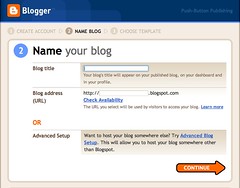
Here, you're required to enter a Title for your blog and the blog URL (the blog title can easily be changed later, from your Settings Tab. For the URL, it can also be changed provided it's not taken up by someone else. So at this stage, it's best to choose wisely at this stage).
TIP: Use the Check Availability link to confirm that your desired URL is available. Then write the URL for easy reference.
STEP 3: Choose a template

Choose a blog template. You can always change the design later. So don't spend too much time at this stage. There aren't much designs to choose from and you can spend more time customising your blog later.
Confirmation of new blog
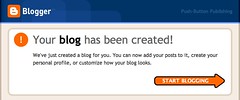
Congratulations! You now have a blog.
Create/ Publish Post
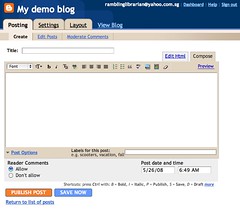
This is where you create a new post. It's almost like composing and sending an email.
Dashboard
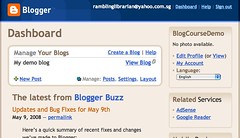
When you next login to Blogger.com, you'll see your Dashboard. This is where you can create a new blog, and also access your existing blog(s).
Settings tab
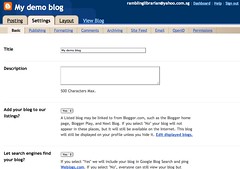
Go to the Settings Tab to:
- Change the blog name or description
- Delete your blog
- Change your blog URL
- Blog formatting (date/ time settings)
- Comment Moderation/ Image Verification/ Email notification
- Permissions to view/ post to your blog
Layout tab

The Layout Tab is where you can:
- Add "Page Elements" (these are things like a blogroll, counters, HTML codes for stats etc.)
- Change your fonts and colours
- Edit your blog HTML template directly
- Pick a new Blogger.com template
For more tips on using Blogger.com, read this post.
[This is an updated post, from an earlier one, dated Nov 2006]

This work by Ivan Chew is licensed under a Creative Commons Attribution-Noncommercial-Share Alike 3.0 License. For permissions beyond the scope of this license , please contact via RamblingLibrarian@gmail.com.
No comments:
Post a Comment
Note: Only a member of this blog may post a comment.