Checking out the embedded music player from Archive.org, from this upload. I wonder if the player would automatically reflect the new upload list (i.e. when files are added or removed):
DISCLAIMER: This blog serves as a teaching and demonstration tool. It is NOT affliated or endorsed by any organisation.
Showing posts with label demo. Show all posts
Showing posts with label demo. Show all posts
September 07, 2008
May 30, 2008
A highly subjective and biased list of social media tools for libraries, librarians, library school coordinators
Here's a highly subjective and biased list of social media tools for libraries, librarians, library school coordinators :)
Useful stuff for librarians/ libraries
- Online image editor: Snipshot.com
- Shorten long URLs: TinyURL.com
- Maps: earth.google.com | maps.google.com
- Instructional: www.instructables.com
- Mindmapping tool: cmap.ihmc.us
- Open Source audio editing software – audacity.sourceforge.net | Audacity tutorials - audacity.sourceforge.net/help/tutorials
- Creative Commons - CreativeCommons.org
- ASK! a librarian - www.pl.sg
Blogs, Wikis & other social media platforms
- Blogs: Blogger.com | Wordpress.com
- Messaging: Twitter.com
- Wikis: Wikispaces.com | wetpaint.com
- Social bookmarking: del.icio.us
- Photosharing: Flickr.com | picasaweb.google.com
- Video-sharing: YouTube.com | TeacherTube.com | video.google.com
- Cataloguing: www.librarything.com
- Powerpoint: Slideshare.net
- Audio/ Video depository and resource: www.archive.org
- Documents: docs.google.com
- Online Annotation: sharedcopy.com | zotero.com
- Podcasting: podbean.com | odeo.com
RSS/ Feed Readers/ Alerts
- RSS readers: www.google.com/reader | www.bloglines.com
- What's RSS? Video from the CommonCraftShow
- Alerts: www.google.com/alerts
Search
Blog search: Blogsearch.google.com | Technorati.com
Blog 'Bulletins': Tomorrow.sg | Yesterday.sg
Statistical tools - www.sitemeter.com | www.statcounter.com | www.google.com/analytics
Discussion forums/ mailing lists: groups.yahoo.com | groups.google.com
May 26, 2008
Updated: Creating blogs with Blogger.com
DISCLAIMER: I created this post as an aid for the blog courses I conduct. They are not endorsed by Google or Blogger.com.
Click on the images to view additional notes.
Login/ Create Blog

Go to Blogger.com to sign up for an account.
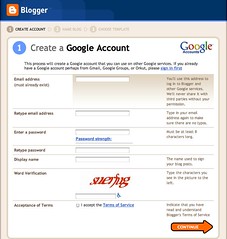
STEP 1: Create a Google account

You need a Google user account in order to create a blog with Blogger.com ('cos Blogger.com is owned by Google).
You don't need to create an account if you already have Google-related accounts like Gmail and Google Groups (read the instructions below the header "Create a Google Account".
Blogger.com requires you to enter an email address (you can always create an additional email account Gmail, Yahoo! or Hotmail).
TIP: Write down all the addresses/ IDs/ passwords that you create along the way. And keep this safe (destroy it once you've committed it to memory). Some participants get confused after signing up for a few things along the way, that they can't log in to their accounts when they try to do after the session)
The Word Verification is a feature for blogger to ensure it's a human being that's creating an account, rather than an automatic program (spambot).
IMPORTANT: Keep your password secret. Google will never, ever ask you for your passwords. If you ever receive any emails asking you for your account ID and passwords, read it very very carefully and you probably should ignore it. Because they are likely to be scam mails.
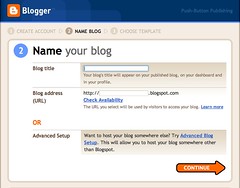
STEP 2: Name your blog

Here, you're required to enter a Title for your blog and the blog URL (the blog title can easily be changed later, from your Settings Tab. For the URL, it can also be changed provided it's not taken up by someone else. So at this stage, it's best to choose wisely at this stage).
TIP: Use the Check Availability link to confirm that your desired URL is available. Then write the URL for easy reference.
STEP 3: Choose a template

Choose a blog template. You can always change the design later. So don't spend too much time at this stage. There aren't much designs to choose from and you can spend more time customising your blog later.
Confirmation of new blog

Congratulations! You now have a blog.
Create/ Publish Post

This is where you create a new post. It's almost like composing and sending an email.
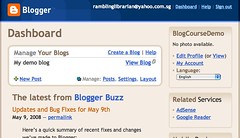
Dashboard

When you next login to Blogger.com, you'll see your Dashboard. This is where you can create a new blog, and also access your existing blog(s).
Settings tab

Go to the Settings Tab to:
Layout tab

The Layout Tab is where you can:
For more tips on using Blogger.com, read this post.
[This is an updated post, from an earlier one, dated Nov 2006]

This work by Ivan Chew is licensed under a Creative Commons Attribution-Noncommercial-Share Alike 3.0 License. For permissions beyond the scope of this license , please contact via RamblingLibrarian@gmail.com.
Click on the images to view additional notes.
Login/ Create Blog

Go to Blogger.com to sign up for an account.
STEP 1: Create a Google account

You need a Google user account in order to create a blog with Blogger.com ('cos Blogger.com is owned by Google).
You don't need to create an account if you already have Google-related accounts like Gmail and Google Groups (read the instructions below the header "Create a Google Account".
Blogger.com requires you to enter an email address (you can always create an additional email account Gmail, Yahoo! or Hotmail).
TIP: Write down all the addresses/ IDs/ passwords that you create along the way. And keep this safe (destroy it once you've committed it to memory). Some participants get confused after signing up for a few things along the way, that they can't log in to their accounts when they try to do after the session)
The Word Verification is a feature for blogger to ensure it's a human being that's creating an account, rather than an automatic program (spambot).
IMPORTANT: Keep your password secret. Google will never, ever ask you for your passwords. If you ever receive any emails asking you for your account ID and passwords, read it very very carefully and you probably should ignore it. Because they are likely to be scam mails.
STEP 2: Name your blog

Here, you're required to enter a Title for your blog and the blog URL (the blog title can easily be changed later, from your Settings Tab. For the URL, it can also be changed provided it's not taken up by someone else. So at this stage, it's best to choose wisely at this stage).
TIP: Use the Check Availability link to confirm that your desired URL is available. Then write the URL for easy reference.
STEP 3: Choose a template

Choose a blog template. You can always change the design later. So don't spend too much time at this stage. There aren't much designs to choose from and you can spend more time customising your blog later.
Confirmation of new blog

Congratulations! You now have a blog.
Create/ Publish Post

This is where you create a new post. It's almost like composing and sending an email.
Dashboard

When you next login to Blogger.com, you'll see your Dashboard. This is where you can create a new blog, and also access your existing blog(s).
Settings tab

Go to the Settings Tab to:
- Change the blog name or description
- Delete your blog
- Change your blog URL
- Blog formatting (date/ time settings)
- Comment Moderation/ Image Verification/ Email notification
- Permissions to view/ post to your blog
Layout tab

The Layout Tab is where you can:
- Add "Page Elements" (these are things like a blogroll, counters, HTML codes for stats etc.)
- Change your fonts and colours
- Edit your blog HTML template directly
- Pick a new Blogger.com template
For more tips on using Blogger.com, read this post.
[This is an updated post, from an earlier one, dated Nov 2006]

This work by Ivan Chew is licensed under a Creative Commons Attribution-Noncommercial-Share Alike 3.0 License. For permissions beyond the scope of this license , please contact via RamblingLibrarian@gmail.com.
May 23, 2008
Tips on using BLOGGER.COM
Some links from Blogger.com's Help pages that I feel all new Blogger.com users ought to know. These tend to the the Frequently Asked Questions from those new to blogger.
More tips, for blogging newbies:
#1 - Write down your User ID, Password, and Blog URL somewhere (keep it safe, until you've committed it to memory).
I've seen many people get all caught up in the excitement of creating a new blog for the first time that they forget their User name, password or the blog URL. They'd lament that they can't find their blog or login etc.
#2- When creating your new blog, just choose a blog design quickly. And move on!
I've personally experienced this myself -- you spend ages choosing and mulling over the blog design template, colours, layout etc. My advice is to just quickly choose a design to get through the process. It's more important to familiarise yourself with how the Dashboard (the admin stuff) works. You can always change the design later.
#3 - Choose a consistent blog name with your URL
For instance, if I want my blog to be called "Rambling Librarian", then my preferred URL is also "RamblingLibrarian.blogspot.com". This is for consistency.
#4 - Blogger.com Vs Blogspot.com
I get this alot: Newbie creates a blogger.com blog. Then says "my blog can't be found". I'd tell them to check the URL. The blog URL should be "blogSPOT.com" and not "blogger.com". Example:
[See also: Creating blogs with Blogger.com, 26 May 2008]

This work by Ivan Chew is licensed under a Creative Commons Attribution-Noncommercial-Share Alike 3.0 License. For permissions beyond the scope of this license , please contact via RamblingLibrarian@gmail.com.
- How do I create a blog that Blogger will host for free?
- How to delete your Blogger.com blog
- Using the Blogger.com editor
- How to moderate comments in Blogger.com
- How to delete comments
- About protecting your Blogger.com user name and password
- How do I control who can view my blog
More tips, for blogging newbies:
#1 - Write down your User ID, Password, and Blog URL somewhere (keep it safe, until you've committed it to memory).
I've seen many people get all caught up in the excitement of creating a new blog for the first time that they forget their User name, password or the blog URL. They'd lament that they can't find their blog or login etc.
#2- When creating your new blog, just choose a blog design quickly. And move on!
I've personally experienced this myself -- you spend ages choosing and mulling over the blog design template, colours, layout etc. My advice is to just quickly choose a design to get through the process. It's more important to familiarise yourself with how the Dashboard (the admin stuff) works. You can always change the design later.
#3 - Choose a consistent blog name with your URL
For instance, if I want my blog to be called "Rambling Librarian", then my preferred URL is also "RamblingLibrarian.blogspot.com". This is for consistency.
#4 - Blogger.com Vs Blogspot.com
I get this alot: Newbie creates a blogger.com blog. Then says "my blog can't be found". I'd tell them to check the URL. The blog URL should be "blogSPOT.com" and not "blogger.com". Example:
- MyFirstBlog.blogger.com is incorrect
- MyFirstBlog.blogspot.com is the correct URL
[See also: Creating blogs with Blogger.com, 26 May 2008]

This work by Ivan Chew is licensed under a Creative Commons Attribution-Noncommercial-Share Alike 3.0 License. For permissions beyond the scope of this license , please contact via RamblingLibrarian@gmail.com.
October 11, 2007
Vodcast Demo - "Getting to the SMU Exec Media Theatre"
This is a demonstration video for the Podcast/ Vodcast workshop -- Civil Service College "Introduction to New Media Communications" course, 11 - 12 Oct 2007.
The podcasting workshop (Day 2) would be held at the Singapore Management University, Executive Media Theatre, Administration Building.
The video was recorded with my digital camera (so the video quality isn't that great).
After I went home, I did a minor edit with the video by cutting out the walk down the passage way. I save the original clip as two files and merged them together in Apple iLife '06 iMovie.
Next, I wrote a brief script and recorded the voice over with the Audacity audio editor and recorder (which I'll be showing the participants how to use). Then saved it as a MP3 file.
The MP3 file was imported to the iMovie clip. Cuts on the audio was done in iMovie.
For the background music, I selected "Saturday In May" (a song I composed in May 2006, when I was learning my way around GarageBand). Adjustments was also made to the track volume in iMovie.
Finally, I added the transitions and titles.
Took about 45 minutes (excluding the recording of the video).
Subscribe to:
Comments (Atom)